
Best PUBG Mobile Control Settings & Layout Guide (2026): 2, 3, and 4-Finger Setups Explained

If you’re still losing close-range fights even though your aim feels fine, the problem usually isn’t your sensitivity. It’s your control layout — how your fingers are actually distributed across the screen. Sensitivity gets all the attention, but layout is what decides whether you can move, aim, and shoot at the same time, or whether you’re stuck doing one thing at a time while someone else beams you.
Quick answer: Most players under Platinum are fine on 2-finger (thumb-only) controls. From Platinum to Ace, 3-finger claw is the easiest upgrade with the best time-to-improvement ratio. 4-finger claw is the current standard for competitive and Conqueror-tier play because it’s the only setup that lets you move, aim, fire, and crouch simultaneously. 5- and 6-finger setups exist but only make sense on tablets or very large phones, and the learning curve isn’t worth it for most players.
The rest of this guide breaks down exactly how to set up each layout, what settings actually matter, and the mistakes that quietly cap your rank.
Dialing in your control layout is the foundation, but there’s more to a competitive setup — if you’d rather play with a controller than touch, our guide on how to play PUBG Mobile with a controller walks through the sensitivity and mapping differences. It’s also worth checking whether PUBG Mobile is cross-platform in 2026 if you’re squadding up across devices with these settings. Once your layout is sorted, custom PUBG skins are a natural next step for making your setup feel like your own. And if your inputs feel delayed no matter what you set, our guide on reducing lag in mobile games covers the fixes settings alone can’t solve.
Why Your Control Layout Matters More Than People Think
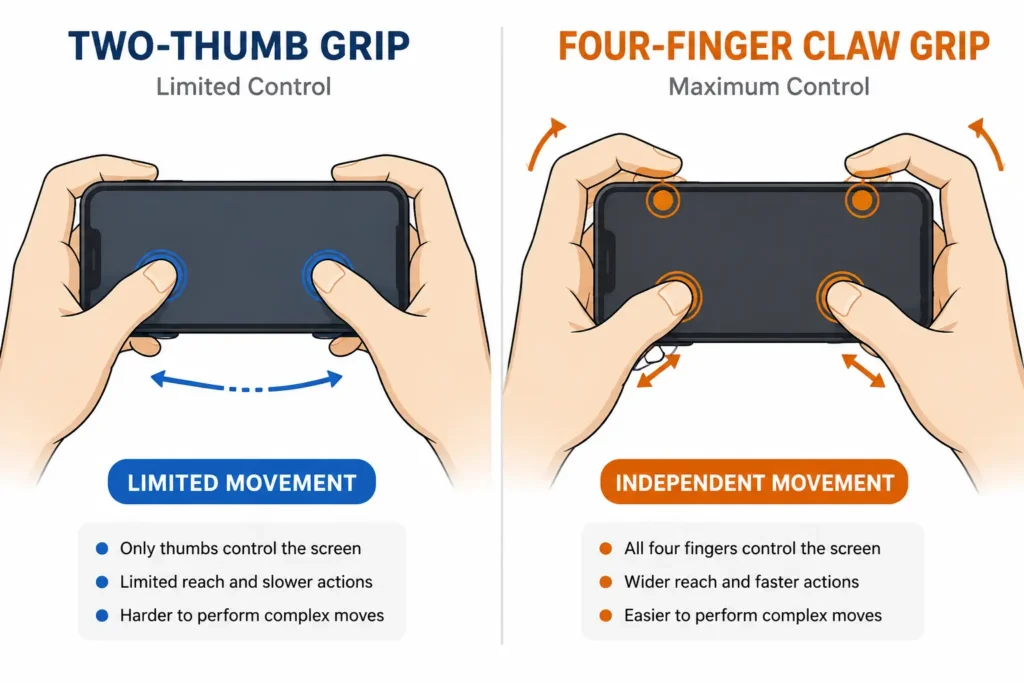
Every PUBG Mobile control setup is built around one limitation: you only have so many fingers that can reach the screen without you losing your grip on the phone. A standard 2-finger (thumb-only) setup uses your left thumb for movement and your right thumb for everything else — aiming, firing, scoping, jumping, crouching, proning. That “everything else” is the problem. You physically cannot aim and crouch at the same time when one thumb is doing both jobs.
Claw grips solve this by bringing your index fingers onto the screen, freeing your thumbs to stay dedicated to movement and camera control. That’s the entire mechanical advantage — nothing more mysterious than that. More fingers on the glass means more actions can happen at once, which is why claw layouts show up disproportionately in Ace and Conqueror lobbies.
None of this means claw is automatically “better” for you specifically. Your hand size, your phone’s screen size, and how much time you’re willing to spend retraining muscle memory all matter more than what a pro plays with.
2-Finger vs 3-Finger vs 4-Finger: Which One Should You Actually Use?
| Setup | Who it’s for | Learning curve | Ceiling |
|---|---|---|---|
| 2-finger (thumbs) | Beginners, casual players, anyone under Platinum | None | Hard cap — can’t crouch/peek while aiming |
| 3-finger claw | Players ready for one real upgrade without a steep relearn | 3–5 days to feel normal | Good up to Diamond/Ace for most playstyles |
| 4-finger claw | Competitive/ranked-focused players, Ace push and above | 3–4 days for basics, 2–3 weeks to feel automatic under pressure | Current standard for high-level ranked play |
| 5–6 finger claw | Tablet users, players chasing marginal competitive gains | 2–3 months for real mastery | Highest ceiling, but only worth it on large screens |
If you’re just starting out, don’t feel pressured to jump straight to 4-finger. Learning map awareness, loot rotation, and gunfight fundamentals is hard enough without also relearning your hand position. Spend your first few weeks on 2-finger, get comfortable with the game itself, then decide if you want to invest in a claw upgrade.
Best 2-Finger Control Settings for PUBG Mobile
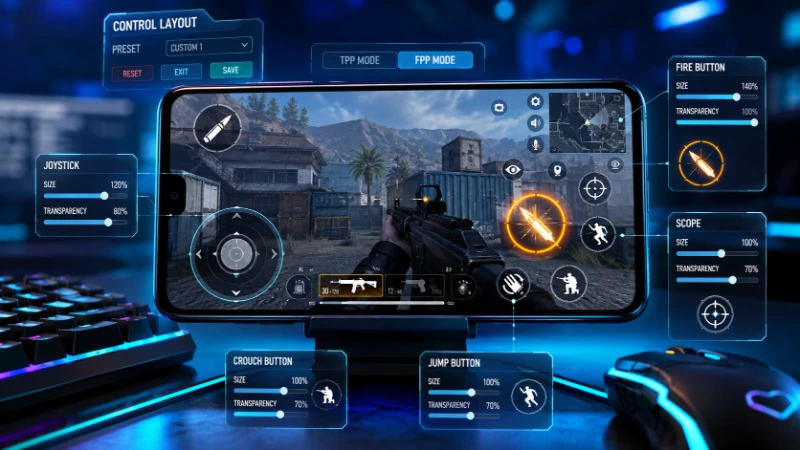
Thumb-only play isn’t a “beginner tax” — plenty of casual and even mid-rank players stay on it because it’s comfortable and requires zero relearning. If this is you, the goal isn’t more buttons, it’s making the two you use as reliable as possible.
- Movement joystick: size around 110–120%, positioned low on the left so your thumb rests on it naturally without stretching
- Fire button: sized comfortably under your right thumb’s natural resting position — not so large it overlaps the aim/camera zone
- Scope/ADS button: placed close to fire but with clear separation to avoid mis-taps mid-fight
- Transparency: 70–80% so the HUD doesn’t visually clutter your view of enemies
The most common mistake at this stage isn’t the layout — it’s leaving default button sizes untouched. Spend ten minutes in Training Ground resizing things to where your thumbs actually land, not where the default template put them.
Best 3-Finger Claw Layout and Settings
Three-finger claw adds your right index finger into the mix, usually taking over the fire button so your right thumb is freed up for aiming and camera control alone.
Typical placement:
- Left thumb — movement joystick
- Right index finger — fire button (commonly placed top-left or top-right depending on hand orientation)
- Right thumb — aim, scope, jump, crouch, prone (whatever’s left)
This is the layout with the best return on effort. You unlock shoot-while-moving and shoot-while-aiming without redesigning your entire hand position, and most players adjust within less than a week. If you’re deciding between “should I claw at all,” start here before jumping to 4-finger.
Recommended starting point for settings:
- Scope Mode: Hold
- Peek & Fire: On
- Fire button size: 110–130%
Best 4-Finger Claw Layout and Settings for PUBG Mobile
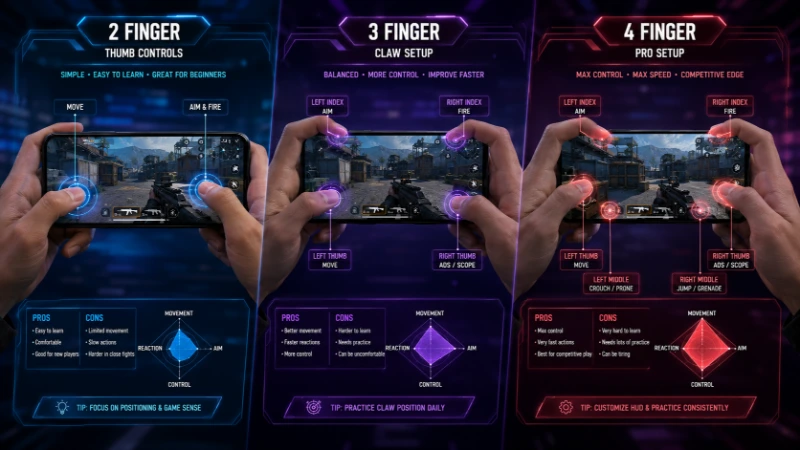
This is where most serious ranked players land, and it’s the setup behind the “best control settings for PUBG Mobile” searches you’ll see everywhere. The appeal is simple: both thumbs stay on movement and camera, both index fingers handle fire and a secondary action (usually crouch or scope), so you’re never forced to lift a finger off one job to do another.
Core button placement
- Left thumb: movement joystick, bottom-left
- Left index finger: fire button, positioned in the upper-left quadrant, wherever your finger naturally curls over the top edge of the phone
- Right thumb: aiming and camera control across the right side of the screen
- Right index finger: scope activation, peek, or crouch — whichever action you use most in close-range fights
Settings that actually move the needle
Based on cross-referenced community testing and Training Ground benchmarking, these ranges hold up consistently across most mid-to-large phones:
- Fire button size: 120–140%
- Button transparency: 60–80%
- Minimum spacing between buttons: 15–20% of button width (this alone fixes most accidental-tap complaints)
- Scope Mode: Hold
- Peek & Fire: On
- Peek Mode: Mixed
- Camera Rotation while Leaning: Disable
- Camera Rotation while ADS: Disable
Sensitivity ranges that pair well with 4-finger claw
Claw generally needs slightly lower ADS sensitivity than thumb play because your inputs are more precise and less prone to overcorrection. Reasonable starting points:
- 3rd Person No Scope: 180–200%
- Red Dot / Holographic ADS: 50–60%
- 2x Scope ADS: 35–45%
- 3x Scope ADS: 25–35%
- 6x/8x Scope ADS: 10–20%
If you use gyroscope (recommended once you’re on claw — the two complement each other well), start close-range scopes around 300% and scale down as magnification increases, dropping to roughly 50–100% at 6x–8x.
Treat all of the above as a starting range, not gospel. Change one value at a time, test it in Training Ground against a static target, and only carry it into ranked once it feels automatic — not just “better than before.”
A note on layout codes
You’ll see numeric layout codes shared everywhere — Reddit threads, YouTube descriptions, community posts. They’re a genuinely useful shortcut when they work, but here’s the catch nobody mentions: codes break silently after patches, and a code that worked perfectly on someone else’s 6.7-inch phone can feel completely wrong on your 6.1-inch one. Rather than list specific codes here that may already be outdated by the time you’re reading this, we maintain a living, version-checked codes reference that we verify after every patch — that’s the more reliable way to use community codes without wasting a ranked session on a broken import.
What About 5-Finger and 6-Finger Claw?
These setups split actions across five or six points of contact — both thumbs, both index fingers, plus one or two additional fingers (usually pinkies bracing the back of the device, or a second set of fingers on tablets with enough surface area). The appeal is maximum simultaneous control: aim, fire, crouch, peek, and lean all become independent inputs.
The honest tradeoff: mastery realistically takes two to three months, hand fatigue during long sessions is a real problem, and it only works comfortably on tablets or phones above roughly 6.7 inches. Unless you’re actively pushing for a competitive/tournament path, 4-finger claw gets you nearly all the benefit for a fraction of the practice investment.
Device-Specific Notes
Screen size changes what’s actually comfortable, regardless of what layout you’re chasing:
- Under 5.8 inches: 3-finger claw is usually the practical ceiling — index-finger reach to upper-screen buttons gets cramped on 4-finger setups
- 6.0–6.7 inches (most modern phones): the sweet spot for 4-finger claw — both index fingers can reach upper-quadrant buttons without compromising thumb control
- iPad / tablets: enough surface area for 5–6 finger claw to be genuinely comfortable, with larger button sizing (130–150%) and wider spacing (20–25%) than phone layouts
- Budget/lower-spec Android devices: touch response can lag slightly under load — favor simpler 3–4 finger layouts with larger buttons over precision-dependent 6-finger setups, since input delay hurts complex layouts more
Software Layout vs. Physical Controller — They’re Not the Same Thing
Worth clearing up because the two get searched together constantly: everything above is about the on-screen touch layout built into PUBG Mobile’s own settings — free, official, and fully supported. A physical Bluetooth or clip-on controller is a different topic entirely, and it comes with a real caveat: PUBG Mobile doesn’t officially support external controllers, and the game’s anti-cheat has gotten noticeably stricter about detecting non-touch input patterns. If hardware is what you’re after, that’s a separate decision with its own risk tradeoffs worth understanding first — not something to bolt onto a claw layout as an afterthought.
Common Mistakes That Quietly Cap Your Rank
- Copying a pro’s layout exactly. Their hand size, phone, and thousands of hours of muscle memory aren’t yours. Use any shared layout as a starting reference, then reposition buttons to where your fingers actually rest.
- Changing layout and sensitivity in the same session. You won’t be able to tell which change helped or hurt. Adjust one variable at a time.
- Switching layouts every few days. Muscle memory needs a minimum of a few days of consistent practice per layout before you can fairly judge it. Constant switching guarantees you never feel comfortable with anything.
- Ignoring button spacing. Most “I keep hitting the wrong button” complaints are solved by adding 15–20% more spacing between elements, not by moving to more fingers.
- Assuming a code stopped working because you did something wrong. Sometimes it’s just outdated. Check whether it’s been reverified since the last patch before troubleshooting your own settings.
How Long It Actually Takes to Get Used to a New Layout
This is the part most guides gloss over, and it’s the reason a lot of players quit a claw switch after two days and go back to thumbs.
- Days 1–3: Expect to feel worse, not better. This is normal muscle-memory friction, not a sign you made the wrong choice. Play Team Deathmatch, not ranked, during this window.
- Week 2: Performance typically returns to your old baseline.
- Weeks 3–4: Most players start seeing a real improvement over their old thumb performance.
- Beyond that: gains level off, and further improvement comes from sensitivity fine-tuning and game-sense, not the layout itself.
If you’re not willing to accept a rough first few days, this is the moment to decide that honestly rather than switching back and forth. A layout you half-commit to will always feel worse than either fully committing to claw or staying on thumbs.
Frequently Asked Questions
What is the best control setting for PUBG Mobile? There isn’t one universal “best” — it depends on your rank goals and screen size. For most players actively trying to improve, 3-finger claw offers the best improvement for the least relearning, while 4-finger claw is the standard for competitive/Ace-and-above play.
Is claw better than thumb in PUBG Mobile? Mechanically, yes — claw allows simultaneous movement, aiming, and secondary actions that thumb-only play can’t replicate. But “better” only matters if you’re willing to go through the multi-day adjustment period. Casual players who are happy with their current rank don’t need to switch.
How long does it take to master 4-finger claw? Basic comfort within 3–4 days of focused practice; feeling automatic under ranked pressure typically takes 2–3 weeks. Expect a temporary dip in performance during the first few days.
Can I use 4-finger claw on a small phone? It’s possible below 6 inches but noticeably harder — index-finger reach to upper-screen buttons gets cramped. 3-finger claw is usually the more comfortable ceiling on smaller devices.
Why do my imported layout codes stop working? Layout and sensitivity codes are tied to how the game’s settings menu is structured at a given patch. When PUBG Mobile updates, codes built for the previous version can shift or fail to import correctly. Always test an imported code in Training Ground before relying on it in ranked.
Should I use gyroscope with claw controls? Most competitive claw players do, since gyroscope handles fine aim correction while your fingers handle the larger inputs. It’s not required, but the two are commonly used together for a reason.
What’s the difference between a control layout and a controller? A control layout is the on-screen touch setup built into PUBG Mobile itself — free and officially supported. A physical controller is external hardware, which PUBG Mobile doesn’t officially support and which carries its own anti-cheat risk considerations.